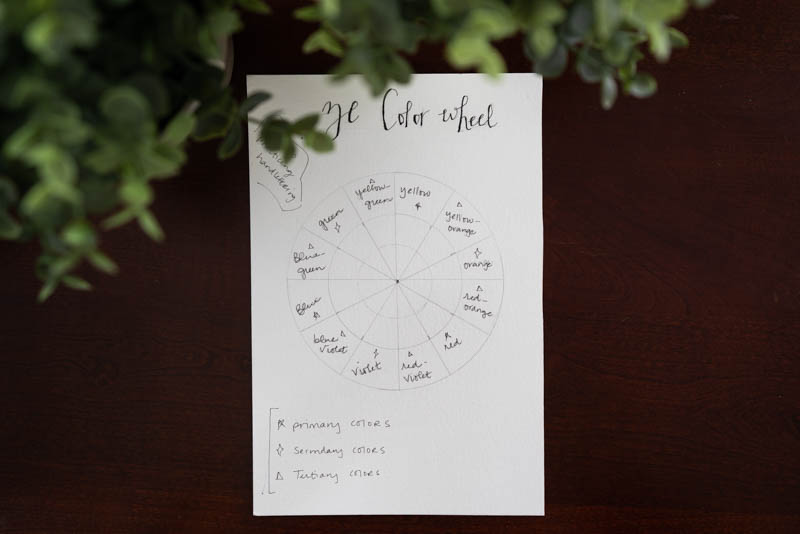
Ze Color Wheel
Who would have thought painting a color wheel with watercolor would be so much fun? I definitely didn’t. I like painting things that have inspired me in my real, face to face, tangible life, ya know like trees, and birds, and smiles, and food.
But the truth is I’m not very, ...hmm..., good at painting those things just yet. It all looks quite juvenile--which actually isn’t a bad thing, but it isn’t the style I’m shootin’ for. I haven’t learned how to develop my own style yet, though I have a clearer idea every new day. It’s hard to learn to break the rules when I don’t even know the rules. I’ve yet to learn the foundations of watercolor: how to avoid hard lines, why to avoid hard lines, how to mix colors, what paper to use, and there’s this thing about shading that I have no idea how to do.
I serendipitously found Jenna Rainey’s online watercolor tutorials, and my goodness. She has been the tutor I needed.
She begins with supplies and such. And then, she asks everyone to paint a color wheel, not pretty flowers or beginner friendly landscapes, but a color wheel--as it is a great way to understand color mixing and grasping color theory at the most basic level.
She’s messy, but it’s a compassionate mess. She invites the beginner into her very experienced world with no pretense and expectation.
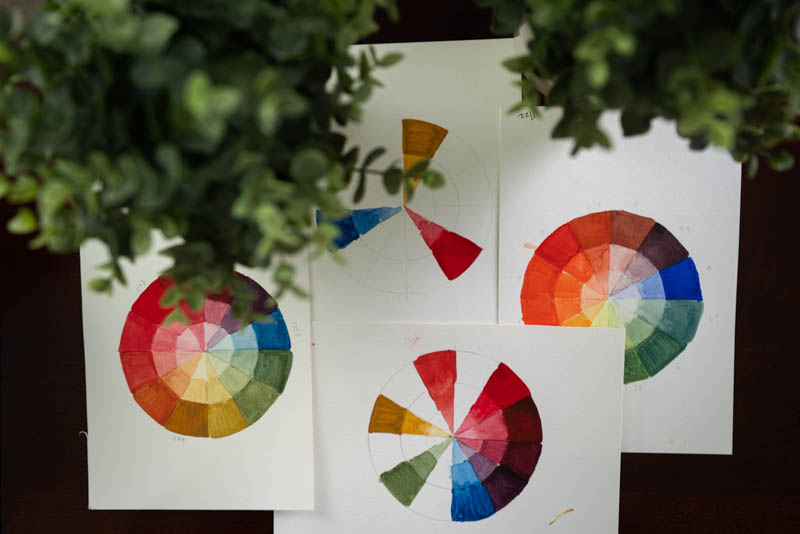
I enjoyed this process so much that I did it three different times within the week. I used different primary colors for each one to see the varying colors I had at my disposal.
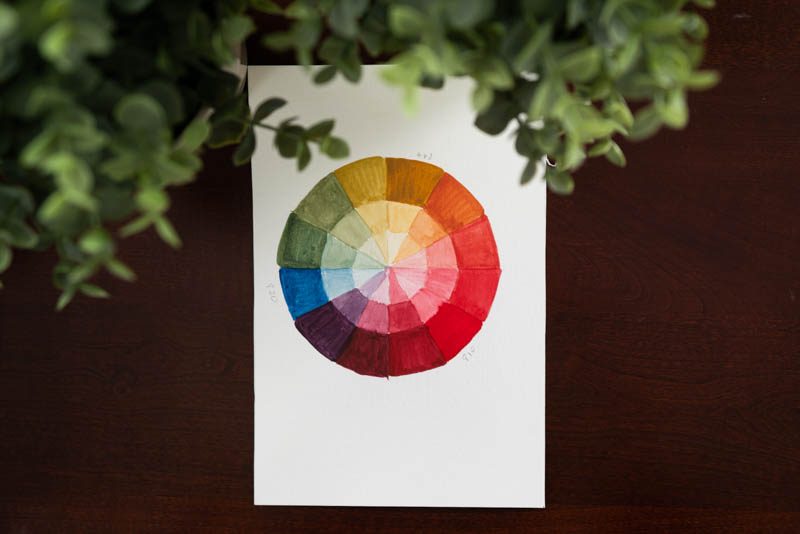
Without further ado, I give you my color wheel.
Step 1: Lightly trace out three circles in pencil.
No one-- I mean not even the most genius of us all can draw a perfect circle, let alone three, without tracing. I used this little circle gadget (I have a mathematician scientist as a husband and he’s always saving the day). And for the smallest circle, I used a non-scratch furniture pad. It worked pretty well.
I divided the circle into quarters. Then, I used the half-circle gadget that cleverly marked degrees on the inside to help me divide the quarters into thirds (so two lines per piece of quarter pie). I used the 30 degree and 60 degree markers to find the perfect spot for each quarter.
So our Tertiary Color Wheel should have 12 triangle slices, and each triangle slice should have 3 little triangles, giving us a grand total of 36. By the end of this project, we’ll have over 36 shades of colors.
Step 2: Find your primary color of choice.
So, as I learned this week, there are only 3 primary colors, blue, yellow and red (for paint that is, not photography. Photography uses blue, green and red as primary colors).
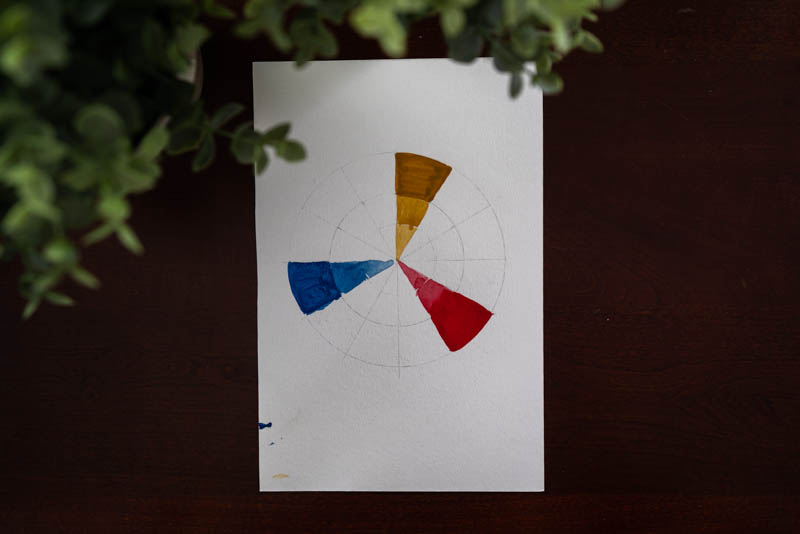
My watercolor kit came with several shades of each primary color. I played around with each of the different shades - I’m trying to learn and the best way I learn is by making mistakes and playing, and I did a lot of both.
Step 3: Paint your pies.
I chose to paint my primary colors first. You definitely do not have to. That’s the beauty of this project. On the outer edge, fill in your triangle with the most pigmented shade. This I’ve learned is called "value", the degree of shade.
So if your color value is light, this is closer to transparent than not.
If your color value is high, then it is a strong color pigment.
Once I filled in the outer edge of my yellow triangle, I dabbed my brush with a bit more water, then dabbed the paper towel (bc my brush is always too wet), then filled in beneath my yellow for a lighter value, making my way to the center. The triangle nearest the center is just about transparent. To get that value, just keep adding more water to your brush. (again, dab on paper towel or cloth to avoid hard water lines).
Step 4: Mix secondary colors.
Now for the fun part! This was my favorite part. I think I get into full artist mode, twisting an imaginary thin mustache, when I mix paints.
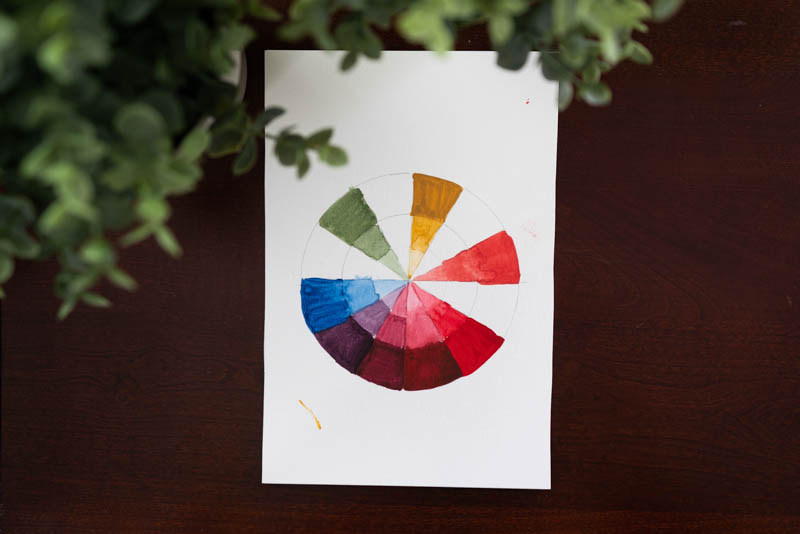
Our secondary colors are a mix of 2 primary colors.
Just like primary colors, we have 3 secondary colors: orange, purple, and green.
I started with yellow and red; I put yellow at the top of my wheel and moved clockwise - not quite the rule breaker I set out to be, huh?
Is there a top to a circle?
Equal parts yellow and red make orange. And these are our warm colors (hello, summer!). I filled in the triangle situated in the middle of yellow and red. And just like I did for the primary colors’ values, I did the same thing with orange, adding more water as I made my way to the center of the wheel.
I repeat that step, equal parts of 2 primary colors, with the rest of my secondary colors, moving clockwise around the wheel. Of course you can go in any direction.
Red + blue = purple. I oddly have an explicit memory from kindergarten learning this exact thing.
Blue + yellow = green.
Step 5: Moving on to Tertiary Colors
Tertiary colors are a mix of 1 primary color and 1 of its secondary colors. For example, blue mixed with green makes blue-green tertiary color.
Mixing blue with orange will produce brown. After all, orange is just a mix of yellow and red. And as we learned, red, yellow and blue make brown. It shouldn’t have surprised me so much to learn that, but ya know, it did.
So, think of it this way, as long as the primary color is in the secondary color you’ll get a tertiary color.
Once again, I began with yellow, mixing it with the orange I had already mixed together on my tray. Equal parts yellow to orange (bc you’re a smarter cookie than me, you’ll notice it’s just 2 parts yellow to 1 part red).
And you guessed it! Place this yellow-orange in between the orange and yellow triangles. Make your way to the center of the wheel by adding more and more water to your brush or paint.
I do this with all the secondary and primary colors.
- Yellow-orange
- Red-orange
- Red-violet
- Blue-violet
- Blue-green
- Yellow-green
I had so much fun learning about values, hues, and primary colors, especially.
I think, from the sample of my color wheels, my favorite color is blue-green.
Thank you so much for reading my adventures in watercolor. I know my color wheel is far less than perfect, but I hope it encourages you to just have fun with it, and, by doing so, I hope you find liberation in illustrating your life.
Here’s a small list of the resources I used for this little tutorial and other helpful watercolor tips I found this last week: